Raspberry Pi IP Address Guide: Find & Use Your Public IP
Are you struggling to remotely access your Raspberry Pi or connect to services hosted on it? Understanding and obtaining your Raspberry Pi's IP address both private and public is the foundational step towards unlocking its full potential, from hosting web servers to remote monitoring.
Navigating the digital landscape often requires us to understand the intricacies of network configurations. One of the most common challenges that many users face is figuring out their Raspberry Pi's IP address, whether it is the internal one or the public one.
Whether you're a seasoned tech enthusiast or a curious beginner, grasping the basics of IP addresses is essential for interacting with your Raspberry Pi. This article aims to provide a comprehensive guide on finding and utilizing your Raspberry Pi's IP address, offering practical tips and solutions to common hurdles.
This process is more crucial when you want to access your Raspberry Pi remotely, such as for SSH access. The ability to find the public IP allows for access from anywhere. Many users often set up their Raspberry Pi to email their "external IP address" to themselves periodically. This is a practical solution for staying connected.
The journey begins with comprehending the distinction between internal and external IP addresses, followed by the practical steps required to locate each one.
Let's delve deeper into the specifics of finding your Raspberry Pi's IP address.
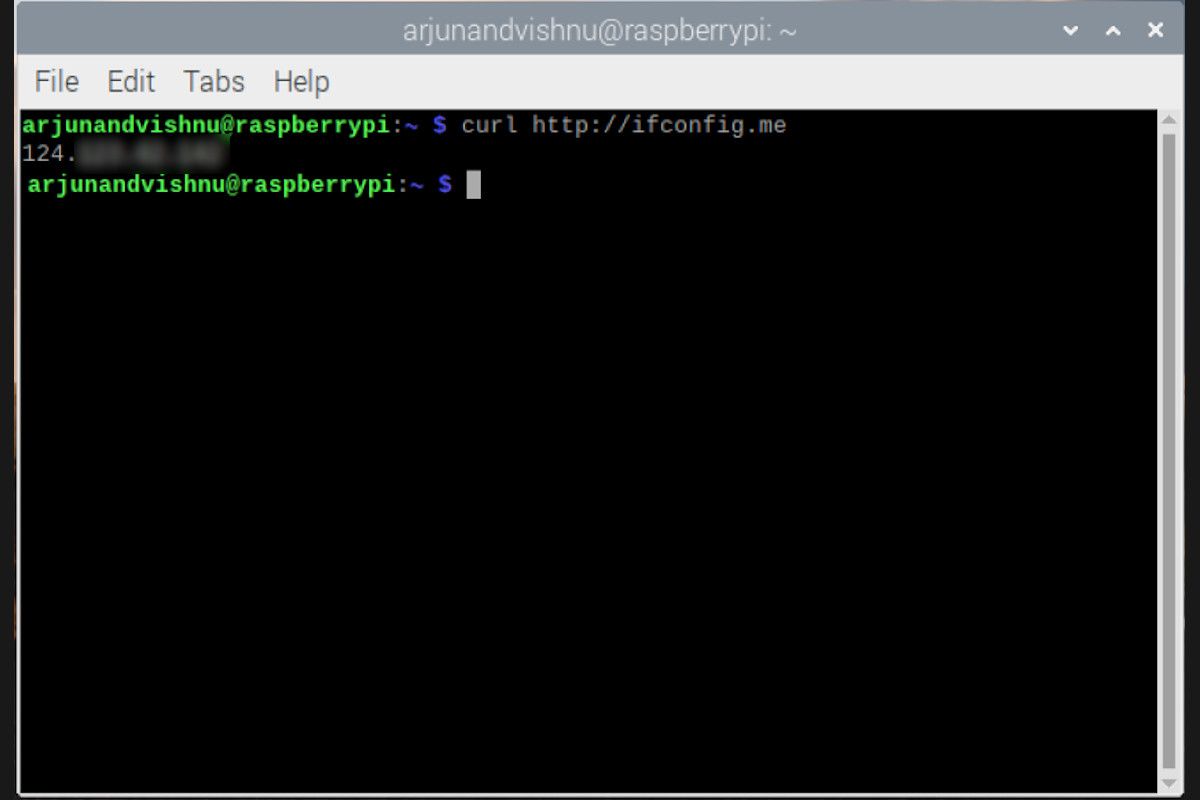
There's a straightforward method to obtain your public IP address on a Raspberry Pi. As suggested by a user, forwarding port 80 from your router to your Raspberry Pi is necessary if you intend to run a public web server. Forcing IPv4 or IPv6 is also possible, by using services like ipv4.icanhazip.com or ipv6.icanhazip.com.
This guide will walk you through the process of not just identifying the IP address but also offer several ways to make this task a bit easier, offering a script. This tutorial will encompass both internal and external IP address, which will cover the basic need for Raspberry Pi users.
Finding your Raspberry Pi's IP is more than just a technical task; it's a fundamental skill that opens doors to various functionalities, enhancing the usability of your device and enabling remote access.
For those interested in setting up a web server, remember that forwarding port 80 from your router to your Raspberry Pi is a critical step. In order to establish a public web server. This configuration directs web traffic to your Raspberry Pi.
Many enthusiasts create systems to regularly send themselves their "external IP address," keeping them updated with their device's location.
When you can configure static IPs, access to your device becomes seamless, whether you're using it to monitor sensor data, as in the case with Grafana, or simply managing remote access to your data via SSH.
Here's a breakdown of the key methods to find your Raspberry Pi's IP address:
- Using a Web Browser Search: Simply search for "what is my ip" on a search engine. The results will display your public IP address.
- Utilizing External Websites: Several websites can detect your IP address when your device connects to them. These tools are useful for determining your public IP.
- IP Scan Across Your Network: Performing an IP scan is another method to find your Raspberry Pi's IP address. Tools like nmap can be used to scan your network.
Understanding the nature of IP addresses whether public or private is pivotal. Public IP addresses are globally routable and facilitate communication with devices on the public internet. Your ISP assigns you a public IP. Private IP addresses, on the other hand, are used for local networks. Knowing this distinction is essential for understanding how to manage your Raspberry Pi.
Now, let's delve into practical ways to configure and utilize your Raspberry Pis IP address. A static IP setup ensures your Raspberry Pi consistently uses the same IP address, which is crucial for remote access and consistent connectivity.
Let's examine how to set a fixed IP address, ensuring your Raspberry Pi always uses the same one. There are several ways to set a static IP address on your Raspberry Pi:
- Router Configuration: Assign an IP address to your Raspberry Pi in the router configuration.
- Desktop Environment: Set a static IP in the desktop environment.
- Network Configuration: Change the network configuration manually to always use the same IP.
One can control the LEDS connected with raspberry pi pico w, using a HTML code from another computer on the same network, and to open it on internet.
The ability to connect to your dashboard when you replace the URL is a common challenge, which can be solved by using the correct port number.
If your raspberry pi has a public static ip address, then you need to configure your router completely differently and you probably can't have any other computers on your network. If your router has a public static ip address and passes some of the data to the raspberry pi, then you have to configure the router a little bit differently.
Here's a glimpse of the key IP address classifications relevant to your Raspberry Pi:
- Public vs Private IP Addresses: Understand the difference between the addresses for communication on the internet.
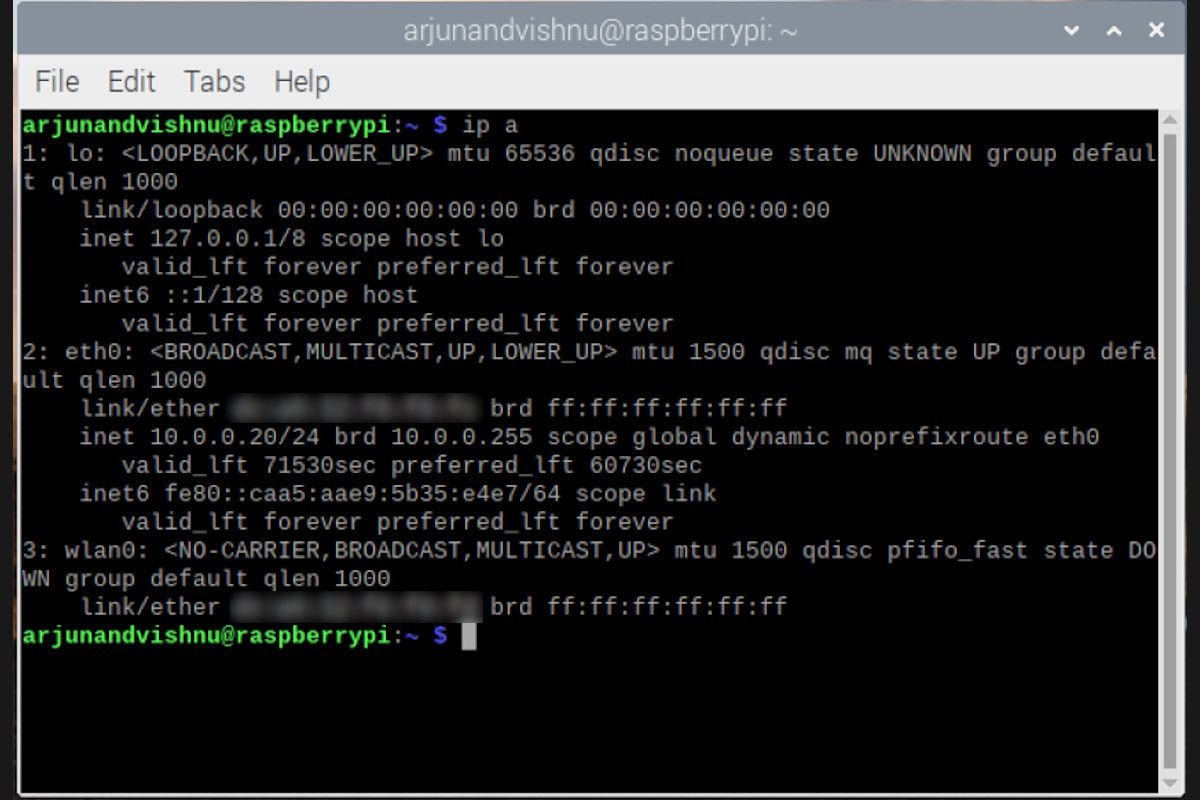
- Internal IP address: This is the IP of your Raspberry Pi that we configured earlier.
Most home networks will have about 254 possible combinations of IP addresses, so looking at them all is an easy task for a computer. By knowing how to find these addresses, you can unlock the full potential of your Raspberry Pi. Using various tools and techniques, you'll be able to identify both the internal and external IP addresses.

